이번에는 안드로이드 스튜디오를 이용해 챗봇 만들기를 진행해 보도록 하자.
우선 이번에는 이미 여러 자료들이 있었고, 그중 한 유튜브 강의를 보면서 주로 진행했는데, 마찬가지로 2024년이 되면서 메세지 요청 방식이 조금 달라져서, 그대로 따라했다가 에러가 났었다.
이에 python으로 진행했을 때처럼 openai의 사이트를 보면서 수정했고, 성공적으로 실행되는 것을 확인할 수 있었다.
그럼 이제 AI 챗봇 만들기를 진행해보자.
우선 AndroidManifest.xml에서 인터넷 퍼미션을 추가해 주어야 한다.
<uses-permission android:name="android.permission.INTERNET" />
그 다음 layout을 꾸며보자.
나는 챗봇이 메인 엑티비티가 아니기 때문에 empty activity를 생성하고 ChatBot이라고 명명했다,
따라서 activity_chat_bot.xml에 들어가서 아래와 같이 진행해주자.
<?xml version="1.0" encoding="utf-8"?>
<RelativeLayout
xmlns:android="http://schemas.android.com/apk/res/android"
xmlns:tools="http://schemas.android.com/tools"
xmlns:app="http://schemas.android.com/apk/res-auto"
android:id="@+id/main"
android:layout_width="match_parent"
android:layout_height="match_parent"
tools:context=".ChatBot">
<androidx.recyclerview.widget.RecyclerView
android:layout_width="match_parent"
android:layout_height="match_parent"
android:id="@+id/chat_view"
android:layout_above="@id/bottom_layout"
android:layout_below="@id/doggy_dine" />
<TextView
android:layout_width="match_parent"
android:layout_height="wrap_content"
android:id="@+id/welcome_text"
android:layout_centerInParent="true"
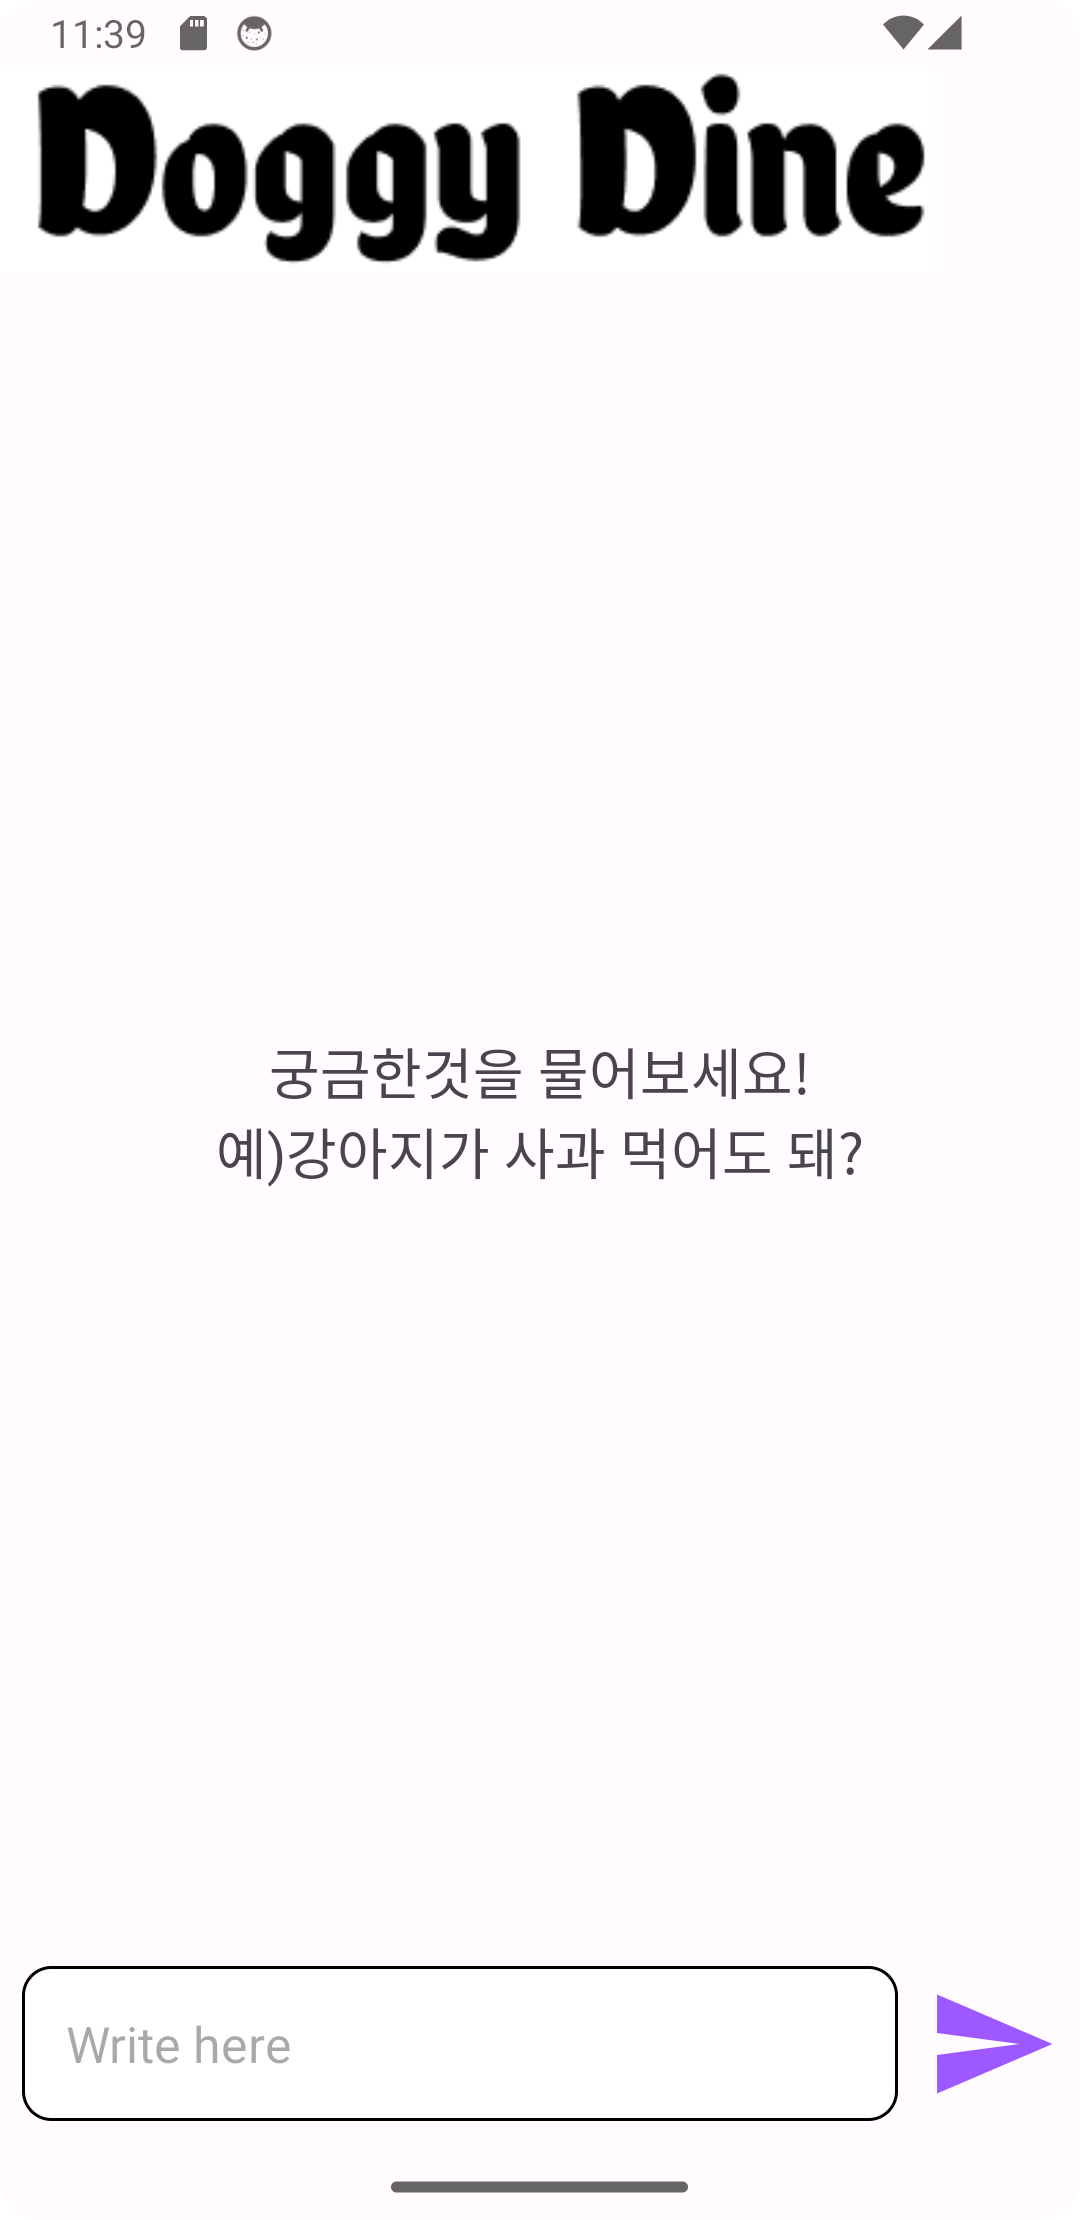
android:text="궁금한것을 물어보세요!\n예)강아지가 사과 먹어도 돼?"
android:gravity="center"
android:textSize="20dp" />
<RelativeLayout
android:layout_width="match_parent"
android:layout_height="80dp"
android:layout_alignParentBottom="true"
android:padding="8dp"
android:id="@+id/bottom_layout">
<EditText
android:layout_width="match_parent"
android:layout_height="wrap_content"
android:id="@+id/meeage_edit_text"
android:layout_centerInParent="true"
android:hint="Write here"
android:padding="16dp"
android:layout_toLeftOf="@id/send_btn"
android:background="@drawable/rounder_coner"
/>
<ImageButton
android:layout_width="48dp"
android:layout_height="48dp"
android:id="@+id/send_btn"
android:layout_alignParentEnd="true"
android:layout_centerInParent="true"
android:layout_marginStart="10dp"
android:padding="8dp"
android:src="@drawable/baseline_send_24"
android:background="?attr/selectableItemBackgroundBorderless"
/>
</RelativeLayout>
<ImageView
android:id="@+id/doggy_dine"
android:layout_width="wrap_content"
android:layout_height="wrap_content"
app:layout_constraintEnd_toEndOf="parent"
app:layout_constraintHorizontal_bias="0.12"
app:layout_constraintStart_toStartOf="parent"
app:layout_constraintTop_toTopOf="parent"
app:srcCompat="@drawable/doggy_dine" />
</RelativeLayout>
이번에는 drawable파일을 추가해 보자.
위에서 rounder_coner.xml을 불러왔는데, 이를 위해서는 새로 생성해줘야 한다.
<?xml version="1.0" encoding="utf-8"?>
<shape xmlns:android="http://schemas.android.com/apk/res/android"
    android:shape="rectangle">
    <corners android:radius="10dip"/>
    <stroke android:width="1dp"/>
    <solid android:color="@color/white"/>
</shape>
이제 EditText 부분이 둥글게 생기게 되었을 것이다.
다음은 채팅에서 기본인 chat box를 생성해 보자.
이를 위해서는 새로 layout을 생성해 주어야 한다. 나는 chat_item.xml을 생성해 아래와 같이 코드를 넣어주었다.
<?xml version="1.0" encoding="utf-8"?>
<RelativeLayout xmlns:android="http://schemas.android.com/apk/res/android"
    android:layout_width="match_parent"
    android:layout_height="wrap_content"
    android:padding="8dp">
    <LinearLayout
        android:layout_width="wrap_content"
        android:layout_height="wrap_content"
        android:id="@+id/left_chat_view"
        android:background="@drawable/rounder_coner"
        android:backgroundTint="#673AB7"
        android:padding="8dp"
        android:layout_marginEnd="80dp">
        <TextView
            android:layout_width="wrap_content"
            android:layout_height="wrap_content"
            android:id="@+id/left_chat_text_view"
            android:textColor="@color/white"
            android:textSize="18sp"
            />
    </LinearLayout>
    <LinearLayout
        android:layout_width="wrap_content"
        android:layout_height="wrap_content"
        android:id="@+id/right_chat_view"
        android:layout_alignParentEnd="true"
        android:background="@drawable/rounder_coner"
        android:backgroundTint="#1F97F6"
        android:padding="8dp"
        android:layout_marginStart="80dp">
        <TextView
            android:layout_width="wrap_content"
            android:layout_height="wrap_content"
            android:id="@+id/right_chat_text_view"
            android:textColor="@color/white"
            android:textSize="18sp"
            />
    </LinearLayout>
</RelativeLayout>
그러면 이제 bot이 보내는 메세지는 왼쪽에, 내가 보내는 오른쪽에 위치하도록 되었을 것이다.
이번에는 새 java class를 생성해서 message를 잘 처리하도록 하자.
나는 Message.java를 생성해서 아래와 같이 코드를 넣어주었다.
package com.example.doggydine;

public class Message {
    public static String SENT_BY_ME = "me";
    public static String SENT_BY_BOT="bot";
    String message;
    String sentBy;
    public String getMessage(){
        return message;
    }
    public void setMessage(String message){
        this.message = message;
    }
    public String getSentBy(){
        return sentBy;
    }
    public void setSentBy(String sentBy){
        this.sentBy = sentBy;
    }
    public Message(String message, String sentBy) {
        this.message = message;
        this.sentBy = sentBy;
    }
}
이번에는 MessageAdapter.java를 생성해서 아래와 같이 넣어주었다.
package com.example.doggydine;
import android.view.LayoutInflater;
import android.view.View;
import android.view.ViewGroup;
import android.widget.LinearLayout;
import android.widget.TextView;

import androidx.annotation.NonNull;
import androidx.recyclerview.widget.RecyclerView;

import java.util.List;

public class MessageAdapter extends RecyclerView.Adapter<MessageAdapter.MyViewHolder>{
    List<Message> messageList;
    public MessageAdapter(List<Message> messageList){
        this.messageList = messageList;
    }
    @NonNull
    @Override
    public MyViewHolder onCreateViewHolder(@NonNull ViewGroup parent, int viewType) {
        View chatView = LayoutInflater.from(parent.getContext()).inflate(R.layout.chat_item,null);
        MyViewHolder myViewHolder =new MyViewHolder(chatView);
        return myViewHolder;
    }
    @Override
    public void onBindViewHolder(@NonNull MyViewHolder holder, int position) {
        Message message = messageList.get(position);
        if (message.getSentBy().equals(Message.SENT_BY_ME)) {
            holder.leftChatView.setVisibility(View.GONE);
            holder.rightChatView.setVisibility(View.VISIBLE);
            holder.rightTextView.setText(message.getMessage());
        }else{
            holder.rightChatView.setVisibility(View.GONE);
            holder.leftChatView.setVisibility(View.VISIBLE);
            holder.leftTextView.setText(message.getMessage());
        }
    }
    @Override
    public int getItemCount() {
        return messageList.size();
    }
    public class MyViewHolder extends RecyclerView.ViewHolder{
        LinearLayout leftChatView, rightChatView;
        TextView leftTextView, rightTextView;
        public MyViewHolder(@NonNull View itemView){
            super(itemView);
            leftChatView = itemView.findViewById(R.id.left_chat_view);
            rightChatView = itemView.findViewById(R.id.right_chat_view);
            leftTextView = itemView.findViewById(R.id.left_chat_text_view);
            rightTextView = itemView.findViewById(R.id.right_chat_text_view);

        }
    }
}
위의 코드들은 만약 메세지 박스 안에 메세지가 길어지면 자동으로 줄바꿈이 되고, 누가 보내는지에 따라 왼쪽에 배치할 것인지 오른쪽에 배치할 것인지 등을 결정하게 해준다.
다음으로 build.gradle(Module)에 들어가서 dependencies에 okhttp 라이브러리를 넣어주었다.
implementation("com.squareup.okhttp3:okhttp:4.12.0")
자 이제 마지막으로 핵심인 ChatBot.java를 완성해 보자.
package com.example.doggydine;

import android.os.Bundle;
import android.view.View;
import android.widget.EditText;
import android.widget.ImageButton;
import android.widget.LinearLayout;
import android.widget.TextView;
import android.widget.Toast;

import androidx.activity.EdgeToEdge;
import androidx.annotation.NonNull;
import androidx.appcompat.app.AppCompatActivity;
import androidx.core.graphics.Insets;
import androidx.core.view.ViewCompat;
import androidx.core.view.WindowInsetsCompat;
import androidx.recyclerview.widget.LinearLayoutManager;
import androidx.recyclerview.widget.RecyclerView;

import org.json.JSONArray;
import org.json.JSONException;
import org.json.JSONObject;

import java.io.IOException;
import java.util.ArrayList;
import java.util.List;
import java.util.concurrent.TimeUnit;

import okhttp3.Call;
import okhttp3.Callback;
import okhttp3.MediaType;
import okhttp3.OkHttpClient;
import okhttp3.Request;
import okhttp3.RequestBody;
import okhttp3.Response;

public class ChatBot extends AppCompatActivity {
    RecyclerView recyclerView;
    TextView welcomeTextView;
    EditText messageEditText;
    ImageButton sendButton;
    List<Message> messageList;
    MessageAdapter messageAdapter;
    public static final MediaType JSON = MediaType.get("application/json");
    OkHttpClient client;

    @Override
    protected void onCreate(Bundle savedInstanceState) {
        super.onCreate(savedInstanceState);
        EdgeToEdge.enable(this);
        setContentView(R.layout.activity_chat_bot);
        ViewCompat.setOnApplyWindowInsetsListener(findViewById(R.id.main), (v, insets) -> {
            Insets systemBars = insets.getInsets(WindowInsetsCompat.Type.systemBars());
            v.setPadding(systemBars.left, systemBars.top, systemBars.right, systemBars.bottom);
            return insets;
        });
        messageList = new ArrayList<>();
        recyclerView = findViewById(R.id.chat_view);
        welcomeTextView = findViewById(R.id.welcome_text);
        messageEditText = findViewById(R.id.meeage_edit_text);
        sendButton = findViewById(R.id.send_btn);
        messageAdapter = new MessageAdapter(messageList);
        recyclerView.setAdapter(messageAdapter);
        LinearLayoutManager llm = new LinearLayoutManager(this);
        llm.setStackFromEnd(true);
        recyclerView.setLayoutManager(llm);
        sendButton.setOnClickListener((v)->{
            String question = messageEditText.getText().toString().trim();
            addToChat(question, Message.SENT_BY_ME);
            messageEditText.setText("");
            callAPI(question);
            welcomeTextView.setVisibility(View.GONE);
        });
        client = new OkHttpClient().newBuilder()
                .connectTimeout(60, TimeUnit.SECONDS)
                .writeTimeout(120, TimeUnit.SECONDS)
                .readTimeout(60, TimeUnit.SECONDS)
                .build();
    }
    void addToChat(String message, String sentBy){
        runOnUiThread(new Runnable() {
            @Override
            public void run() {
                messageList.add(new Message(message, sentBy));
                messageAdapter.notifyDataSetChanged();
                recyclerView.smoothScrollToPosition(messageAdapter.getItemCount());
            }
        });
    }
    void addResponse(String response){
        messageList.remove(messageList.size()-1);
        addToChat(response, Message.SENT_BY_BOT);
    }

    void callAPI(String question) {
        messageList.add(new Message("... ", Message.SENT_BY_BOT));
        JSONArray arr = new JSONArray();
        JSONObject baseAi = new JSONObject();
        JSONObject userMsg = new JSONObject();
        try{
            baseAi.put("role", "user");
            baseAi.put("content", "You are sweet and bright AI Assistant.");
            userMsg.put("role", "user");
            userMsg.put("content", question);
            arr.put(baseAi);
            arr.put(userMsg);
        }catch (JSONException e){
            throw new RuntimeException(e);
        }

        JSONObject object = new JSONObject();
        try{
            object.put("model", "gpt-3.5-turbo");
            JSONObject messageObj = new JSONObject();
            messageObj.put("role", "user");
            messageObj.put("content", question);
            JSONArray messagesArray = new JSONArray();
            messagesArray.put(messageObj);
            object.put("messages", messagesArray);
        }catch (JSONException e) {
            e.printStackTrace();
        }

        RequestBody body = RequestBody.create(object.toString(), JSON);
        Request request = new Request.Builder()
                .url("https://api.openai.com/v1/chat/completions")
                .header("Authorization", "Bearer MY_SECRET_KEY")
                .post(body)
                .build();

        client.newCall(request).enqueue(new Callback() {
            @Override
            public void onFailure(@NonNull Call call, @NonNull IOException e) {
                addResponse("Failed to load response due to "+e.getMessage());
            }

            @Override
            public void onResponse(@NonNull Call call, @NonNull Response response) throws IOException {
                if(response.isSuccessful()){
                    JSONObject jsonObject = null;
                    try {
                        jsonObject = new JSONObject(response.body().string());
                        JSONArray jsonArray = jsonObject.getJSONArray("choices");
                        String result = jsonArray.getJSONObject(0).getJSONObject("message").getString("content");
                        addResponse(result.trim());
                    } catch (JSONException e) {
                        e.printStackTrace();
                    }
                }else{
                    addResponse("Failed to load response due to "+response.body().string());
                }
            }
        });
    }
}
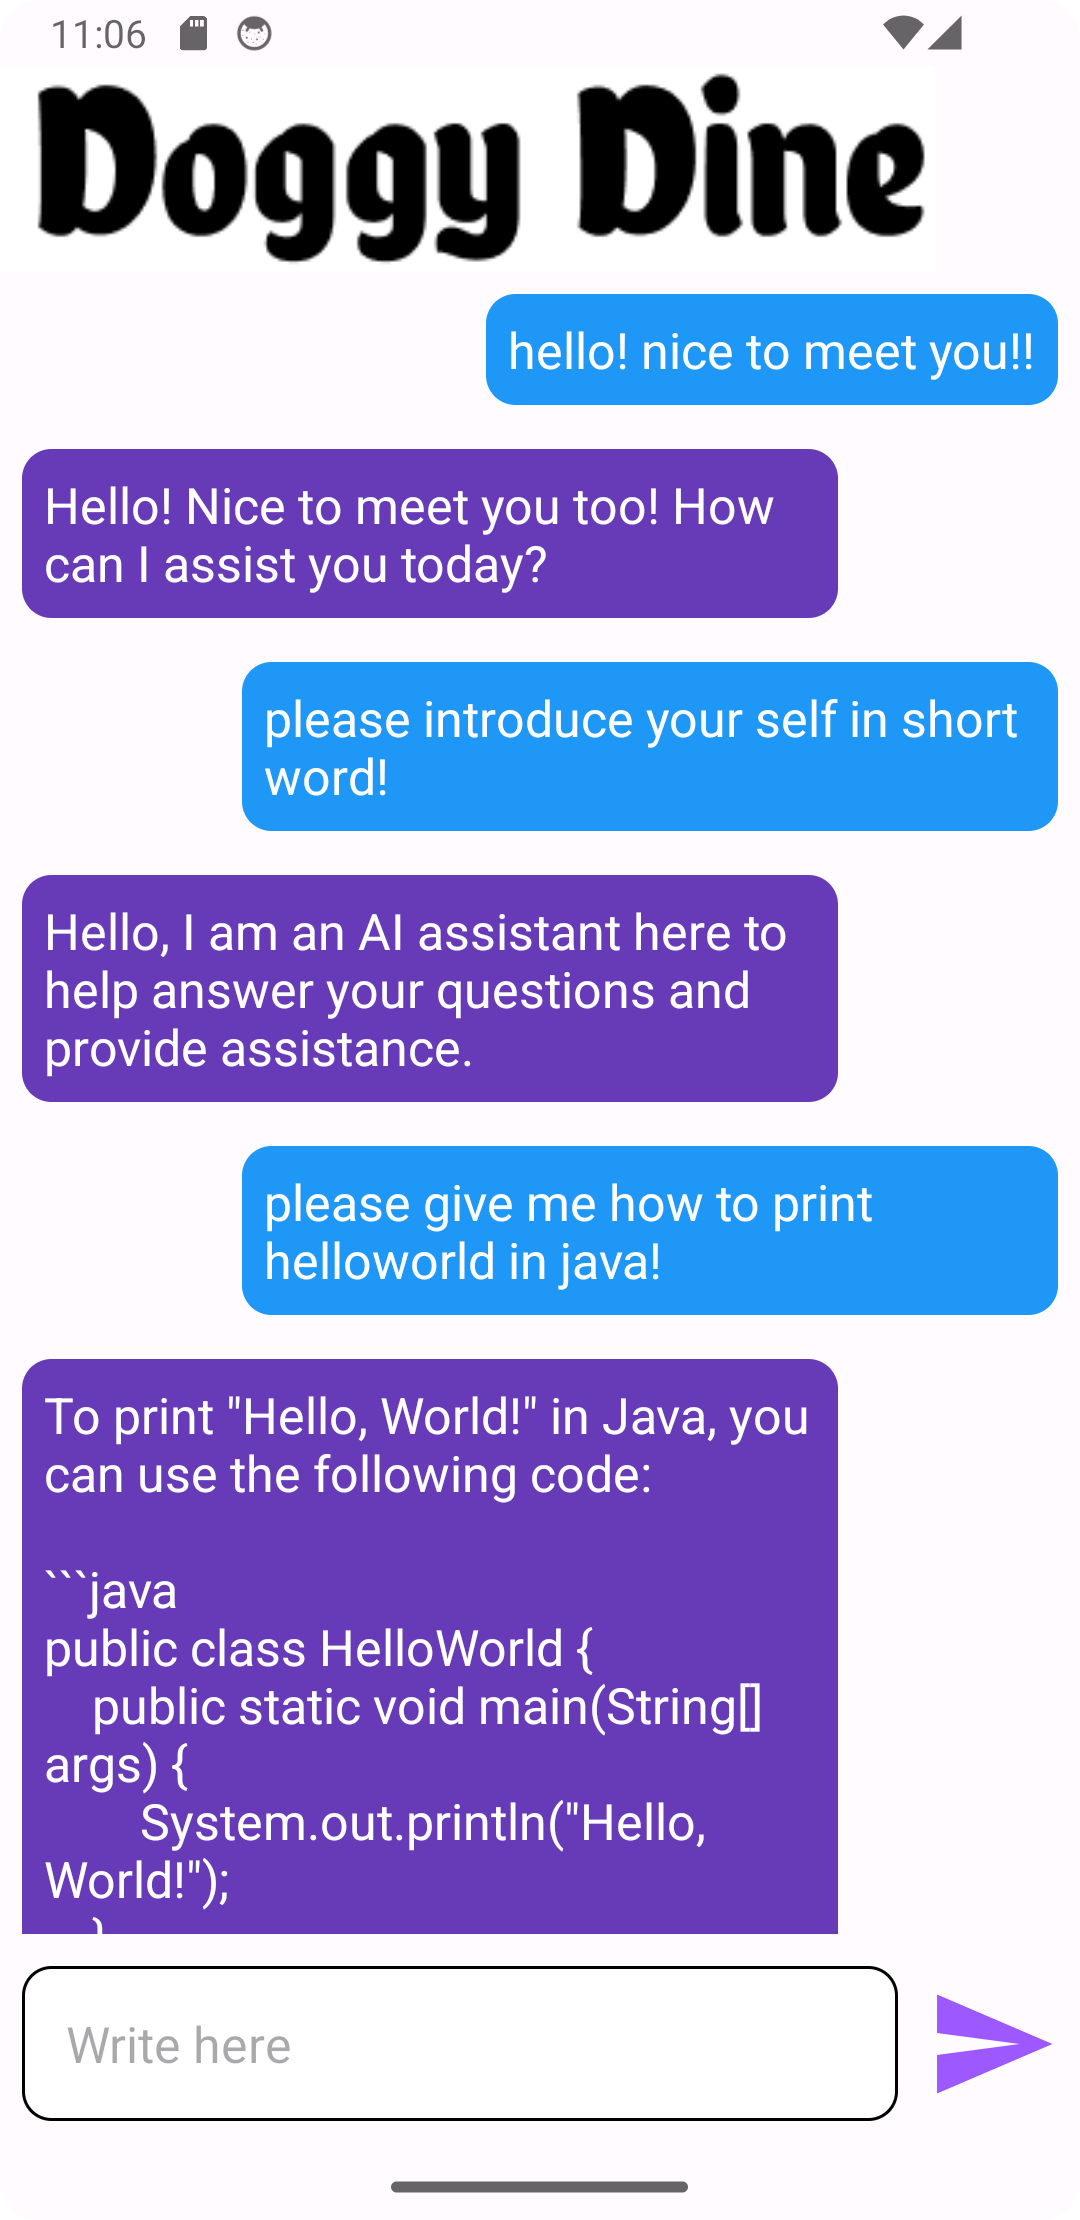
여기까지 진행해주면, 아래와 같이 이쁘게 AI chatbot과 대화가 가능해진다...!!!
2024년 3월 기준으로 모든 버전을 최신으로 업데이트 한 코드이니, 만약 openai에서 추가 업데이트를 진행하지 않는 이상 잘 작동할 것이다..!!
다음에는 프롬프트 엔지니어링을 공부하고 이 챗봇에 적용시켜보겠다!
'정보통신공학전공 > 캡스톤 디자인' 카테고리의 다른 글
| Doggy Dine 캡스톤 디자인 마무리 (1) | 2024.07.07 |
|---|---|
| [Python] GUI 만들기 (0) | 2024.07.07 |
| [Python] 강아지 얼굴 인식하고 구분하기 - 2 (0) | 2024.04.16 |
| [Python] 강아지 얼굴 인식하고 구분하기 - 1 (1) | 2024.04.07 |
| [Python] Openai로 AI챗봇 만들기 (0) | 2024.03.28 |